DIY Christmas Kitchen Cabinet Wreaths
FTC Disclosure - This post contains affiliate links and I will be compensated if you make a purchase after clicking on my links.
*Item received for free for promotional consideration or a sponsored link.
Mini kitchen cabinet wreaths for Christmas are the perfect way to decorate your kitchen this holiday season. There’s nothing more charming than seeing these little wreaths hanging on ribbons from cabinets.
However, if you’ve ever tried to shop for them, you know they’re surprisingly hard to find. And even when you do find them, they tend to be ridiculously overpriced.
So, I finally decided to try my hand at creating them myself. Spoiler alert, I love them! They were so easy to make, I can’t believe I waited so many years to do this project.
In this post, I’ll show you exactly how I made these and how I hang them from my cabinets.


DIY Cabinet Wreaths with Ribbon For Christmas
To make these mini kitchen cabinet wreaths there are only a few easy-to-find supplies needed. I purchased everything from either Dollar Tree or Walmart.
Each wreath cost an average of $3.00 to create.
Here’s what I used.
Supplies Needed
- 8″ Mini Wreath Form
- Wired Garland
- Wired Ribbon (3 patterns)
- Twist Ties
- Adjustables Command Hooks
- Stapler or Hot Glue Gun
- Scissors

Instructions
There are three main steps to creating each wreath. First, you’ll need to create the wreath base. Then, create and attach your bow. Finally, you’ll need to attach a ribbon for hanging the wreaths on your cabinet door.
Let’s get started with creating the wreath base.
1. Create the Wreath Base
To create the wreath base you’re simply going to wrap your garland around your wreath form.

I purchased my wired garland and 8-inch wreath forms from Dollar Tree. The wreath forms come in packs of 2 and the garland comes in a 15-foot segment.
You only need half (7.5 feet) for each wreath. So, begin by cutting your garland at the halfway point.
This will make it easier to work with as you wrap it around the wreath form.


Now, twist the end of your garland around one of the center connections of your wreath form. This will secure it in place and stop it from sliding around as you wrap the garland.


Then proceed to wrap the garland from the outer ring to the inner ring, through the center, and back around again.
Don’t wrap your garland too tightly, or else you won’t have any wiggle room to adjust and fluff it out at the end.

Here’s what my wreath looked like when I finished. You can see I have a bit of a gap from my starting point to my ending point.
This is fine. I simply spread out and adjusted the garland until the gap was closed and the wreath showed no obvious gaps.


Here’s what my first batch of wreaths looked like. I made 12 in total for my kitchen.

2. Create a Bow
The next main step in creating mini Christmas kitchen cabinet wreaths is to create and attach a bow.
This step is optional. If you’re going for a more minimalist look, you can certainly hang plain wreaths with a dainty ribbon.
I, however, created bows for my version, so I’ll show you how I did it the quick and easy way.
I started by cutting a 7-inch strip of ribbon that was 2 inches wide with a pretty Christmas word pattern on it.
Then, I cut a 5-inch strip of red ribbon that was 1 inch wide.


Next, I created a loop out of each of these by folding them in half, pattern side facing in, and stapling them along the edge.
I then flipped them inside out and viola I had a loop.
You can absolutely use a hot glue gun to create your loops. I, frankly, was too lazy to dig mine out of the closet.
In the end, you’ll never know the difference.


Next up is to center your small loop on top of your big loop and pinch a pleat in the middle.

Cinch it with a twist tie, and twist it tightly in the back to secure it in place.


Then, simply fluff out your loops on either side and you have a bow that’s ready to attach to your wreath.

Use the tails of the twist ties to secure the bow to the wreath and you’re done with this step.

3. Attach the Ribbon
The third and final step in the process is to attach a ribbon that you will use to hang your kitchen cabinet wreath from the door.
How long you cut your ribbon will determine where your wreath will rest on the front of your cabinet.
You may need to test one wreath first, to get the right length, then cut the rest of the ribbons to match.
For me, I used a strip of ribbon that was about 22 inches long.

Locate the outer ring of the wreath form just behind your bow. Thread the ribbon between the outer right and middle ring of the wreath form.


Now, use a twist tie to gather and secure the ends together.


Finally, create an loop that is large enough to slip easily over the command hook. You can simply twist your tie around itself to secure or create the beginning of a knot like I did (the same tie method you would use to begin tying your shoes).
Both options will allow you to easily tighten or loosen the loop. This will help you give or take away slack from the hanging ribbon.
The key to hanging your mini kitchen cabinet wreaths is to make them as adjustable as possible. Creating a loop with a simple twist tie works beautifully. Best of all, it’s easily adjusted.

How To Hang Cabinet Wreaths With Ribbon
Last, but not least. Now that you’ve got your hanging ribbon attacked, you’re ready to hang your kitchen cabinet wreath.
To do this, simply open your cabinet door and place a command hook upside down in the center of your cabinet (approximately 1 inch from the top).


Now simply slide your twist tie loop around the hook and drape your mini kitchen cabinet wreath over the front.

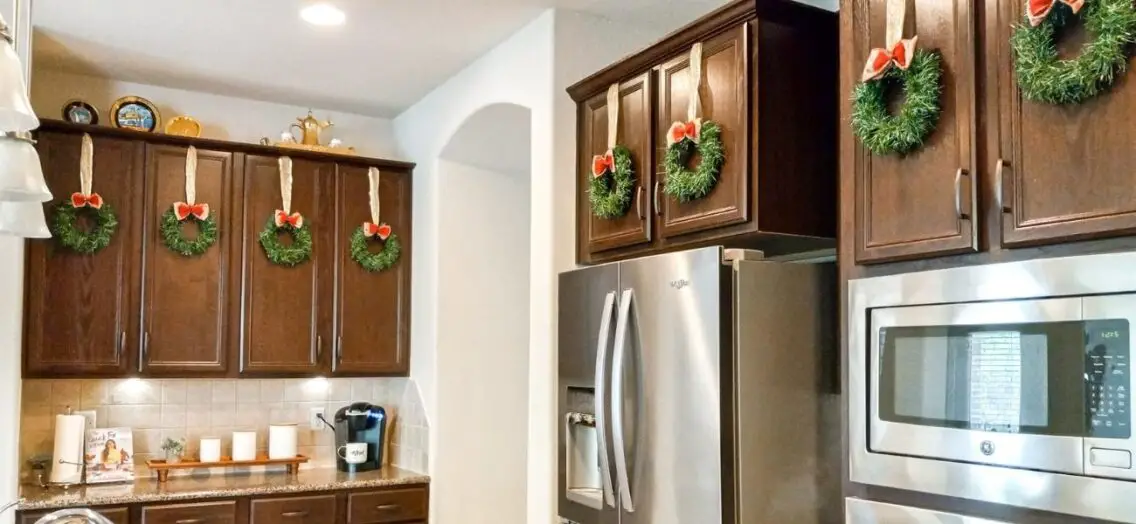
Here’s what my wreaths look like on my short upper cabinets, above my fridge.


This is a look at the kitchen cabinet wreaths along one side of my kitchen.


Conclusion
If you’ve been wanting to add Christmas kitchen cabinet wreaths to your holiday decor, try this easy DIY. It was an easy afternoon project and I love the way they look. Plus, I’ll have them for years to come.
I hope you enjoyed this post. If you did, here are a few more Christmas DIY decor projects you may enjoy.
Don’t forget to join the mailing list before you go. I’ll send you a copy of my weekly newsletter filled with weekend reads, decorating inspiration, and the latest deals on home decor.