6 Easy Steps to Designing a Room
Designing a room from scratch can feel like a big task—but it doesn’t have to be.
Whether you’re decorating your first apartment or giving a tired space a fresh start, having a simple process to follow makes all the difference. Instead of jumping straight into shopping for furniture or choosing paint colors, it’s helpful to approach room design in thoughtful stages.
In this post, we’ll walk through six easy steps to designing a room that looks beautiful and feels right for your everyday life.
Designing a Room
This guide covers the core elements—like layout, furniture, lighting, and accessories—and shows you how to bring everything together with style and purpose.
Whether you’re designing a bedroom, living room, office, or any other space, these steps will help you create a room that’s functional, cohesive, and totally you.

Step 1: Set the Foundation (Define Purpose + Choose a Color Palette)
The first step to designing a room is getting clear on how you plan to use the space. Will this room be a place to relax and unwind, entertain guests, work from home, or all of the above? When you know the purpose of the room, you can make better decisions about what furniture you’ll need, how it should be arranged, and what atmosphere you want to create.
Once you define the function, the next part of setting the foundation is choosing a color palette. A well-chosen palette ties everything together and gives your design direction. Start with one or two neutral base colors, then layer in one or two accent colors for visual interest. You can take inspiration from artwork, a rug, or even your wardrobe.
This early planning stage prevents costly design mistakes later. Designing a room with a clear sense of purpose and color scheme helps you avoid impulse buys that don’t fit—and results in a space that feels cohesive and intentional.

Step 2: Plan Your Layout
The layout is the blueprint of your space—and it’s one of the most important parts of designing a room. A great layout supports the function of the room and helps traffic flow smoothly. Start by measuring the room’s dimensions and noting the placement of windows, doors, and electrical outlets. Then, sketch out a basic floor plan on paper or use free online tools to play around with furniture arrangements.
When creating your layout, think in zones. Where will you sit? Eat? Work? Store things? In small rooms, you might combine functions—like using a dining table as a desk. In larger rooms, make sure each zone has a purpose and feels anchored.
Leave enough space for movement and avoid overcrowding. A good rule of thumb is to allow 18–24 inches between coffee tables and sofas, and at least 30 inches for walkways. Thoughtful layout planning helps you use every square foot wisely and creates a room that functions as beautifully as it looks.

Step 3: Select Furniture (Think Scale & Function)
Furniture is where function meets form—and choosing the right pieces is essential when designing a room. Start with your main, functional pieces: sofa, bed, dining table, etc. Then, build around them with complementary pieces that support how you live—like side tables, storage units, or additional seating.
One of the biggest mistakes beginners make when designing a room is ignoring scale. Scale refers to how the size of your furniture relates to the size of the room. Oversized furniture can overwhelm small spaces, while tiny pieces may feel out of place in a large room. Try to maintain visual balance by mixing different sizes but keeping the proportions appropriate to the space.
Also, think about multifunctionality. Can your coffee table double as storage? Could your guest room bed also serve as a daybed or reading nook? Prioritizing furniture that serves multiple purposes will help maximize both style and utility in your space.

Step 4: Layer in Lighting
Lighting plays a critical—yet often overlooked—role in designing a room. The right lighting can completely transform the way a space feels and functions. Ideally, you’ll want to use a mix of lighting types: ambient lighting (general overhead lighting), task lighting (lamps or sconces for reading or working), and accent lighting (for mood or visual interest).
As you’re designing a room, think about how the space is used at different times of day. Will you need strong lighting for productivity during the day and softer lighting in the evening? If you entertain often, dimmable lights or warm-toned bulbs can help create a cozy atmosphere.
Don’t forget about the style of your lighting fixtures—they’re not just functional, they’re decorative too. Whether it’s a statement chandelier, a set of wall sconces, or simple recessed lights, your lighting choices help set the tone of the entire room.

Step 5: Choose Window Treatments
Window treatments are often added last, but they play a huge role in shaping the final look of a room. When designing a room, consider both function and style. Do you need privacy, light control, insulation—or all three? Depending on your needs, you might choose from curtains, shades, blinds, or a combination of these.
From a design perspective, window treatments help soften hard lines and add texture, color, or pattern to the space. A key trick for making ceilings look higher and rooms feel larger is to hang curtains as high and wide as possible—ideally just below the ceiling and extending past the edges of the window.
Match or complement your window treatments to your room’s overall color palette. Sheer curtains can make a space feel airy and bright, while velvet or linen panels can add richness and warmth. When chosen thoughtfully, window treatments become a finishing touch that brings everything together beautifully.

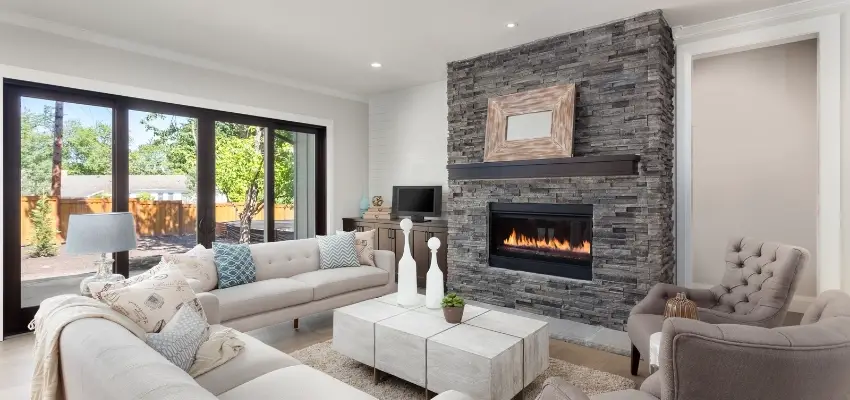
Step 6: Accessorize Thoughtfully (Home Accents & Decor)
The final step in designing a room is adding those finishing touches that make the space feel personal and complete. Accessories include everything from rugs, pillows, and throws to wall art, vases, plants, and candles. These items add warmth, color, and character—but too many can overwhelm the space.
When accessorizing, think in layers. Start with a large anchor piece like a rug, then build up with accent pillows or artwork. Use the “rule of threes” for vignettes—grouping decor in odd numbers tends to look more natural and balanced. Don’t forget about texture—mixing different materials like wood, metal, and fabric creates visual interest.
Leave some empty space too! Negative space allows the eye to rest and gives your favorite pieces room to shine. Thoughtful accessorizing is the key to making your room feel finished without feeling cluttered—and it’s where your personality really shines through.

Conclusion
Designing a room doesn’t have to be complicated or overwhelming. By following these six easy steps—starting with a clear purpose and color palette, planning a smart layout, selecting the right furniture, layering lighting, dressing your windows, and finishing with accessories—you can create a space that looks polished and feels like home.
These steps give you a structure to follow, but they also leave room for creativity and personalization. The most important thing to remember is that designing a room is a process. Take your time, trust your instincts, and enjoy the journey of creating a space that reflects your unique style and supports your everyday life.
That’s all for this post. If you found it helpful, please share it with a friend and follow Dianne Decor on YouTube, Pinterest, and Instagram.
Here are a few more posts you may like:
- Interior Design Basics for Beginners
- Elegant Design Ideas: Practical Tips for a Stylish and Inviting Home
- Interior Design vs Interior Decorating: What’s the Difference?
Don’t forget to join the mailing list before you go. I’ll send you a copy of my weekly newsletter filled with my latest blog posts, decorating inspiration, and the best deals on home decor.