DIY Wreath Recycle – Summer to Fall
FTC Disclosure - This post contains affiliate links and I will be compensated if you make a purchase after clicking on my links.
*Item received for free for promotional consideration or a sponsored link.
Reuse, recycle, and repurpose should be the words at the back of your mind each time the decorating season changes. This DIY wreath recycle is the perfect way to reuse and repurpose your summer wreath for fresh fall decor.
Don’t get me wrong, I love shopping for new decor items, but I love saving money more.
In the post “Low Budget and No Budget Decorating“, I shared a few tips on how to decorate with virtually no money. DIY projects are a great way to save money when decorating.
This year I decided to take on a few new projects and share them with you.
DIY Summer to Fall Wreath Recycle
One of my favorite ways to get a fresh, trendy look for the season without buying all new items is to recycle something. I will purchase a few small items that are new for the season, usually at Dollar Tree.
Then, I’ll incorporate them into a DIY project with something I already own. One of the projects I recently completed is a wreath recycle.
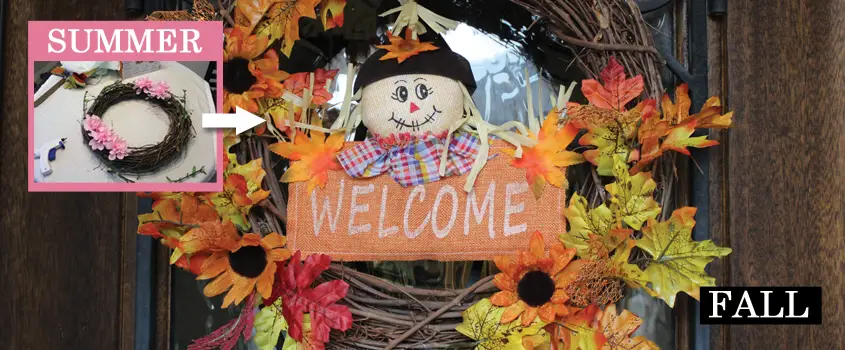
I transitioned my summer wreath into my fall wreath with just a few items. It cost me less than $5 to do and I was done in under 10 minutes! Here’s what I did.

Below is a photo of my old summer wreath. This was a DIY project I completed a couple of years ago.
It was a DIY Pottery Barn Wreath that was posted on YouTube by Bored or Bananas. I have to say, I was very happy with how it came out.
It’s served me well but is finally starting to show some signs of wear and I lost a few flowers during a move.
So, I decided to keep the grapevine wreath base and remove the flowers so I could recycle it into a new fall wreath.

To prep for this project, I pulled off all of the flowers and any large chunks for hot glue that were leftover.
If you don’t have a grapevine wreath like this one check out Walmart. I purchased mine there for under $5.

DIY Wreath for Fall (Dollar Tree)
To turn this into a fall-themed wreath I picked up a few items from a local Dollar Tree. Here’s what I used:
- Scarecrow Welcome Sign (x1)
- Maple Leaves (x2)
- Oak Leaves (x1)
- Sunflowers (x1)
- Grapevine Wreath (x1)
- Hot Glue Gun
- Scissors

Step 1:
Flip your welcome sign over and find the center of the attached string. Cut the string in the center.


Step 2:
Center the welcome sign in the middle of your wreath. Then, wrap and tie each end of the string around either side of the wreath.


Step 3:
Snip the stems of the leaves where they meet the branch. Try to cut them as close to the base as you can. You want to make sure you have enough stem left to weave your leaves into the wreath.
I’m using an Easy Cutter here, but you can use wire cutters or strong scissors to do the job.


Step 4:
Begin tucking the steams of the leaves into the wreath where you’d like them. Then, hot glue them in place for a little extra hold. I placed two-thirds of my leaves on one side and the remaining third on the other side.


Here’s what it looked like when I was done adding the leaves.

Step 5:
Remove the heads of the sunflowers and begin placing them around your wreath. Try to target any bare spots you see between the leaves.
Use as few or as many as you’d like. I ended up using 3 sunflowers on one side and 1 on the other. Once you’ve decided on their placement, hot glue them in place.


DIY Wreath Final Results
That’s it!
Take a look at your wreath and add extra leaves or sunflowers where you feel they’re needed; and you’re done.
You’ll see in the final photos below that I tucked in a few extra leaves towards the top of my wreath and added a single sunflower to the opposite side for a bit more balance.
This fall DIY wreath looks great indoors or out.


Conclusion
In conclusion, I hope you give this project a try. If you do let me know in the comments or message me on Twitter.
Also, check out my previous fall DIY Wreath Centerpiece project for more inexpensive decorating ideas.
Thanks for reading and don’t forget to follow Dianne Decor on Bloglovin’ for more content.