Easy DIY Winter to Spring Wreath Recycle
FTC Disclosure - This post contains affiliate links and I will be compensated if you make a purchase after clicking on my links.
*Item received for free for promotional consideration or a sponsored link.
Spring is finally here, and what better way to welcome the season than with a beautiful and vibrant spring wreath? I’ll tell you what’s better, one that’s free!
Let me show you how to do it.

Decorating on a Budget (Wreath Recycle)
A wreath is a simple and affordable way to add a touch of elegance and charm to any space.
Whether you hang it on your front door, above your fireplace, or use it as a centerpiece for your dining table, a spring wreath is a versatile and eye-catching decor piece that can instantly brighten up any space.
The best part? You can easily make a DIY spring wreath with just a few supplies and a little creativity.
In this blog post, I’ll show you, step-by-step how I transformed my winter wreath into a beautiful, colorful, wreath for spring in minutes.
I was able to create this gorgeous wreath for my front door in about 5 minutes by recycling my winter wreath and using it as my base.
In fact, I intend to use the same wreath base for all 4 seasons this year.
Each time I change up the wreath, I’ll create a post. So if you aren’t subscribed to the newsletter, click here to join so you don’t miss my next wreath recycle.
But, before we get into the tutorial, let me tell you about my base wreath.
Base Wreath
For your base wreath, you’ll want something that is all green or close to it.
You’ll also want to find something that is of good quality and constructed well. It needs to hold up for 12 months through all sorts of weather.
Lastly, look for something that is at least 18 inches for your front door.
Now, you may be thinking, big, high-quality wreaths are expensive. Yes, they can be. But you can also find really affordable options that don’t sacrifice quality as well if you hunt.
Here’s the wreath that I chose as my base for all 4 seasons.
It’s one of the most well-constructed wreaths I’ve ever purchased and I bought it for under $20!

Try Mercari For a Deal
I absolutely love this wreath. I was looking for a eucalyptus or lambs ear wreath for cheap and my friend Katt at lanidoesit.com told me to look on Mercari.
I’d never shopped on the Mercari website before. I thought it was just clothing, but it’s a little bit of everything.
It didn’t take long for me to find what I was looking for and to my surprise, it was listed at only $10.00 + $7.40 for shipping!
From what I can tell, this seller just relists the wreath each time it sells.
This is the link to the current listing at the time I’m writing this. But if it says “sold” just check out the Seller’s Profile here and view all of their listings. You’ll likely see the new listing for this wreath on her profile page.
If you’ve never used Mercari before, feel free to use my invite link here. It will get you $10 off your first purchase and give me a $10 credit as well.
Alternatively, I did find this same wreath on Amazon. But it’s priced a few dollars higher.
Of course, you don’t have to choose this wreath. Use one you already have, or just find a good base that’s green and something you like.
A magnolia leaf or boxwood leaf base works great as well. For more wreath styles that are great all year round check out the post: Front Door Wreaths For All Year Round.
Okay, now let’s get into the wreath recycle.
DIY Winter To Spring Wreath Recycle
I used the base wreath mentioned above as is for my winter wreath. But, now is the time to add a little color.
Tulips are always a sign of spring for me, so I knew I wanted to add some to the wreath. I also added a few lilac stems to introduce a second color.
Everything I used I already had and I encourage you to shop your stash of decor as well. But, if you want to make this exact wreath, here’s what you’ll need.
What You Need
- 12 Faux Tulips
- Faux Lilac Stems (1 bunch)
- Scissors
- Base Wreath (on Mercari) or (on Amazon)

Instructions
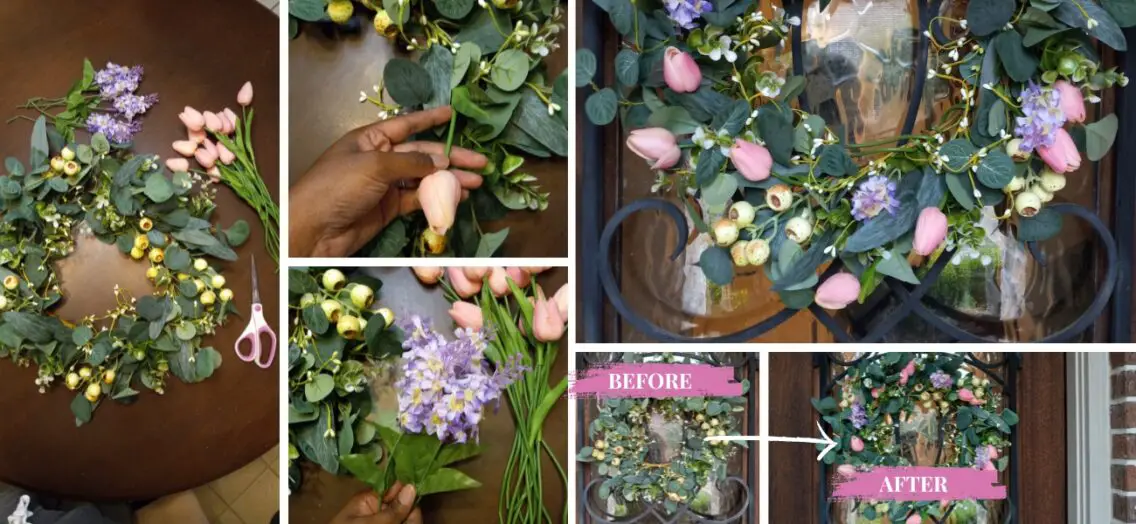
Step 1: Tuck tulip stems into the wreath
Start tucking tulip stems into the wreath. I like to start by placing 4 tulips at a north, south, east, and west position. This helps me get my spacing fairly even.


Then, tuck 2 more stems between each of the 4 starter tulips.

Step 2: Secure tulip stems
Turn the wreath over carefully. Find the tails of the loose tulip stems and begin to twist the end of each stem around the wreath ring.


I secure the very ends instead of just below the tulip heads so that I still have slack to reposition the tulips if needed.
Step 3: Separate lilac stems
If you have multiple lilac heads attached together in a bunch, use a pair of scissors or wire cutters to cut separate them into 4 individual stems.

Step 4: Tuck and secure lilac stems
Tuck the 4 stems just as you did in the first step using north, south, east, and west as your reference points.

Then, gently turn the wreath over, locate the stems of the lilacs, and twist them around the wreath ring to secure them.

Step 5: Fluff Wreath
Pull any tulip heads that may have fallen below the eucalyptus leaves to the front. Make any needed adjustments to the flowers and you’re done.
Final Results
Here’s a look at the final results.


Conclusion
That concludes my DIY winter-to-spring wreath recycle project. My next recycle for this wreath base will be a spring-to-summer transformation. I’ll link it below when it’s complete.
Here are a few more posts you may like:
- Front Door Wreaths For All Year Round
- DIY Spring Wreath: Dollar Tree Floral Rag Wreath
- 3 DIY Projects You Should Skip
If you enjoyed this post, please share it with a friend and follow Dianne Decor on Pinterest and Instagram.
Don’t forget to join the mailing list before you go. I’ll send you a copy of my weekly newsletter filled with my latest posts, decorating inspiration, and sale alerts on home decor.